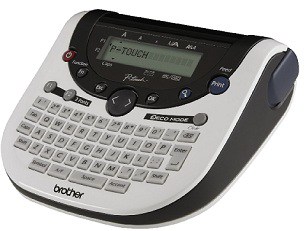
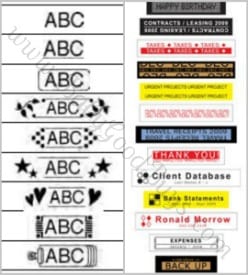
The Brother labeler is super-versatile in the different styles of labels it can produce. I can print out standard block-letter labels, but I can also make a wide variety of decorative labels to add personality and style to my organization. Here’s just a sample of the types of labels I can print:
As you may have guessed from the title, Our home organization is challenged because of ADHD. My husband has had ADHD since his tween years, and home organization is a constant struggle for him.
Surprisingly, I also have ADHD. I was only diagnosed with ADHD after a 3-hour screening in June 2011, so I’m still learning how my mind works and the best ways to work with my mind. Suffice it to say that, while the ADHD diagnosis was shocking (5 months later, I’m still a little surprised!), the evaulation of my behaviors, my habits and my personality characteristics that the screening prompted made me practically see all the puzzle pieces of my life fall into place.
First, let me show you the incredible disorder that my pantry was in: 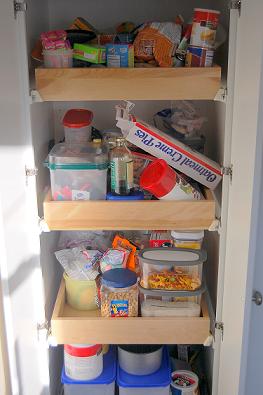
The only other issue I have with the rolling shelves is they can’t be easily adjusted up or down. My baking shelf on the bottom was in total disarray because I couldn’t stack my old canisters up to save space. Combine that with a mishmash of packaging, zip-top bags and various brands of storage containers and I had a mess I just couldn’t live with any longer.
I knew that I wanted to start storing almost everything in square/rectangle containers so they’d fit together better. I also knew that people with ADHD need to have everything labeled to make sure items get returned to their proper place after use. Believe me, if I don’t know where to put an item, it just won’t get put away. Labels keep that from happening.
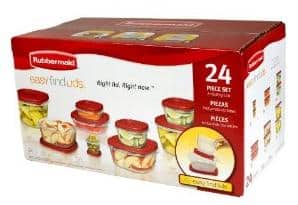
I decided to use a combination of containers I already had (Tupperware Modular Mates and Rubbermaid Premier containers similar to these) and I invested in several boxes of these Rubbermaid containers:
With those containers and my labeler in hand, I pulled everything out of the pantry and sorted it into categories (one for each shelf):
- Baking
- Cooking and Condiments
- Snacks, munchies and treats
- Beverages and miscellaneous
The broad categories meant that there was a place for everything, and I wasn’t left with random items that didn’t have a home.
I proceeded to put every product into a storage container and label it. If the item hadn’t been opened, the entire package was dropped into a container. Every piece was then labeled. Since cooking and baking items were going to the bottom of the pantry, those labels were stuck to the tops of the containers. Everything had a label attached to the side.
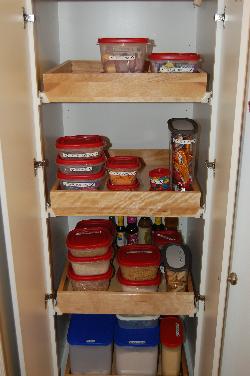
After a few hours of strategizing and shopping, then several more hours of organizing, my pantry actually looked like this:
I have to admit, when I was almost done returning all the containerized and labeled items to the pantry, I actually looked around for more food, convinced that I had forgotten a pile of snacks or pasta in another corner of the kitchen! The amount of room remaining in the cabinet was pretty astounding!
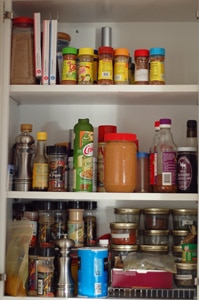
Since that project was finished with room to spare and a few containers left over, I’m pretty sure the next thing I’m going to do is transfer the contents of my spice/miscellaneous cabinet into the pantry, too! There’s room in there, and this cabinet could also use some order:
On top of making my pantry a happy place to store food, I’ve actually utilized the decorative label designs to create unique gift tags on kraft paper bags, preparing me for most birthdays in my family through the end of the year!
While I am truly in love with my Brother label maker, I can’t say it’s perfect. There are a definitely a few areas where this particular product could be improved:
- It takes 6 AA batteries. An AC adapter for the label maker is an optional purchase for a whopping $17.86, which is half the cost of the P-Touch itself!
- Using the label maker isn’t intuitive. The directions for the labeler are crazy-long, considering the compact size and the fact that it’s a label-maker, not an iMac! I admit that I messed up several labels and wasted a lot of label tape getting the formats and designs figured out. No wonder, with 2 function buttons, a Mode button, several style buttons and plenty of other options embedded into each one! However, once I figured it out, I made sure to stick with what I was doing to create a uniform label for the entire project I was working on.
- The standard settings waste a lot of label tape. If the margins aren’t set to Narrow or Chain, there are literally inches of tape fed out before and after each label. On the flip side, if the margins are set to the smaller settings, the slicer will take off the end of the label you just printed, so you need to manually feed a bit of tape out before slicing it off.
All in all, I have to say that the negatives are pretty manageable. I’ve used the starter roll of tape and I’m still on the first set of 6 batteries, so it doesn’t drain battery power super-fast. And now that I know how the margins work, I’ve become extra careful to conserve the tape and use the best settings. The detailed instructions leave me feeling like I have a lot left to learn, but it’s fun to own a label maker that’s capable of so many different functions!
Considering everything the Brother P-Touch Labeler has to offer, I truly think it’s a great tool to own, especially for less than $30! I’m working on creating labels for the more-obvious areas in my home that I’m struggling to maintain, and this label-maker is going to be in use for a long, long time!
I wrote this review while participating in a campaign by Mom Central Consulting on behalf of Brother P-Touch and received product and a gift card to facilitate my review and a promotional item to thank me for taking the time to participate.
Dana E says
Great tips! I told my hubby we’re getting that label-maker! I also have ADHD (as do 2 of my kids) and am always looking for ways to make life easier. I found this book today (how ironic!) and think it falls right along with your article! You can take a sneak peak at the first few pages here…https://www.amazon.com/Organizing-Solutions-Attention-Deficit-Disorder/dp/159233234X/ref=pd_sim_b_12
Shop with Me Mama (Kim) says
I have a label maker that I just got too and love it. Now I just have to start organizing! Sounds like this is a great label maker 🙂
Anne - Mommy Has to Work says
I always wanted a label maker…
Allison says
I agree — good organization is a MUST in an ADHD home. Otherwise, you’ll find yourself living in complete chaos. I know this, personally! Labels DEFINITELY help. PLUS they help with literacy in young children. 🙂
Tammy says
I’ve been thinking about getting one.
blueviolet says
I’m disorganized too, and labels somehow do make a difference in forcing me to put things where they go. I don’t know how labels have such power, but they really do!