Note: This is part 2 of a 3-part series. Please read my first article about Disney Glidden Paint to see my initial thoughts and shopping experience before reading on.
 When I introduced the idea that I’m using Disney Glidden Paint to transform a room in our home, I noted that my son and daughter share a bedroom. All of us are happy with the arrangement, and we don’t have plans to separate them.
The downfall of having a boy and girl share a room is the over-abundance of neutral. There’s just too much brown, tan and white for a kids’ bedroom. I forgot to take a “before” picture of their bedroom, but I can easily explain it: light beige walls, white trim, wood furniture and very little in terms of decor.
Haiden and Piper’s bedroom could definitely use some personality, and Disney Glidden Paint has been helping me do exactly that.
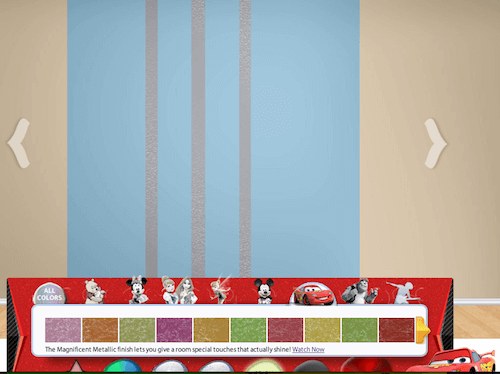 The paint job is still a work in progress, but I actually mocked up my idea using the Room Painter on the Disney Glidden Paint website! The image above shows what I want the final product to look like, and I have three out of the five steps done:
Step 1: Haiden and Piper’s entire room got a fresh coat of Disney Glidden paint in Pawprint with an eggshell finish. This was from the Winnie The Pooh collection of colors. The paint went on smoothly and easily.
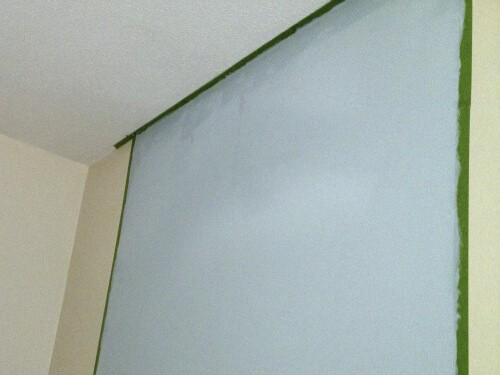
Step 2: I smoothed two strips of Frog Tape painter’s tape down the wall on Haiden’s side. There was about 3-4 feet between the tape. I also taped the ceiling and the baseboard between the horizontal strips to form a large rectangle. Then, I cut in a thin coat of Disney Glidden Rally Blue (from the Disney Cars color selection) all the way around the taped area. After that, I used a full size paint roller so the entire rectangle was filled in with Rally Blue.
Step 3: Apply a second coat of Rally Blue paint to the inside of the rectangle.
Step 4: in progress Tape the painted blue section and add 2-3″ strips of Disney Paint’s Magnificent Metallic specialty finish in silver.
Step 5: in progress Apply Disney Cars wall decals and other road-themed decals to turn the silver strips into roads with cars on them!
 Step 2: I smoothed two strips of Frog Tape painter’s tape down the wall on Haiden’s side. There was about 3-4 feet between the tape. I also taped the ceiling and the baseboard between the horizontal strips to form a large rectangle. Then, I cut in a thin coat of Disney Glidden Rally Blue (from the Disney Cars color selection) all the way around the taped area. After that, I used a full size paint roller so the entire rectangle was filled in with Rally Blue.
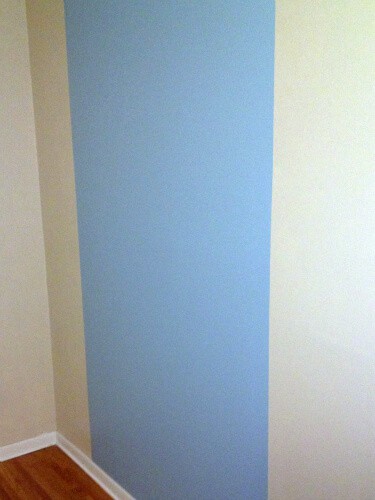 Step 4: in progress Tape the painted blue section and add 2-3″ strips of Disney Paint’s Magnificent Metallic specialty finish in silver.
I think I learn a little more about painting tips, skills and techniques every time I paint, and this time was no exception!
First, I made the classic mistake of choosing a color for the bedroom walls that was just too similar to the previous color. Don’t get me wrong; Pawprint is a perfect warm tan color, but I couldn’t really see the difference after I painted over the ecru shade of the previous paint. On the plus side, that pretty much guaranteed that I only needed to use one coat of Disney Glidden Paint for the biggest area I planned to paint!
Second, I need to remember every time I paint that it’s the taping and prep work that takes the longest time! I really needed the painters tape on the left and right sides of the rectangle to be perfectly horizontal, so my husband suggested I use a laser level. It was a good idea, but I guess the floors in the bedroom are crooked, because when the device showed level, the laser line certainly wasn’t straight! When I did manage to get a straight line from the level, I found myself stepping in front of it so I couldn’t see it to tape against. Plus, cats love lasers, so my kitties had a ball following the laser line to the device and batting it out of position.
After I got my lines started on either side, I switched to quickly marking them with a pencil, then using the tape and a handheld level to get the lines straight from the ceiling to the floor. By the time I had finished putting up two strips of tape, nearly an hour had passed!
On the flip side, painting the rectangle inside the tape was a super-fast job. Cutting in was a breeze, especially since I learned that a 2.5 inch angled sash brush is the best tool for this job. Then, the roller covered so much area that the actual painting only took about 20 minutes. I left the tape up, turned on a fan and let the first coat dry before applying the second coat.
 The trickiest step is definitely going to be those silver stripes created with the Disney Glidden Paint Magnificent Metallic specialty finish. I’m excited to see what it looks like, and I’m even more excited to share the final project with all of you!
Read Part 1 of this story to learn more about Disney Glidden paint and the ways it can make an amazing difference in decorating a room!
Read Part 3 of the story to see the final paint project for a girl and boy sharing a room. It’s amazing what a fun paint can do!
Disclosure: Compensation and products for review were provided by Glidden via MomTrends. The opinions expressed herein are those of the author and are not indicative of the opinions of Glidden.
Nicole Feliciano says
Love that the cats got involved!
Marybeth Hamilton says
Oh, there’s no keeping them away from any laser!